| M-11
Fire Control Group Disassembly |
This is page 4 of the M-11 Fire
Control Group Disassembly tutorial. If you would like
to go to the previous page click on the link below.
Click
here to return to previous page of this tutorial
|
| Steps
8 through 9 |
| Step
8 |
| |
Now we need to restore
spring tension to the trigger frame. You will need
a screwdriver to complete this step.
Take a look at this
photo. Notice how the left spring arm, colored purple,
is hooked into a small pocket, colored green on the
bottom of the trigger frame?
We need to replicate
this.
|
|
|
Take
your screwdriver and push the left spring arm, colored
purple, down to the receiver “floor”. Now
push it under the trigger frame so the little hook will
fit inside the little pocket on the bottom of the trigger
frame.. |
If
you did this correctly it should look like what is pictured. |

|
|
Now we need to connect
the disconnector arm, colored purple, onto the right
spring arm’s, colored green, hook.
To do this push the right
spring arm down and then move the disconnector over
the top of right spring arm hook.
Release pressure off
the right spring arm.
|
| If you
did this correctly it should look like the photo. |
|
| Step
9 |

|
In this step we are
going to install the trip and prepare for the sear
installation. You will need a screwdriver to complete
this step.
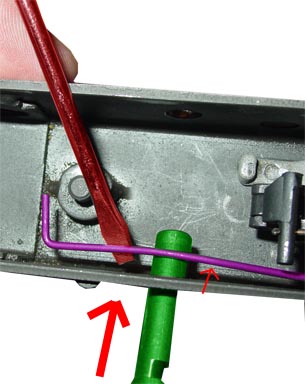
Take your selector
switch axis pin, colored green, and insert it through
the selector switch hole. You will need to use your
screwdriver to lift the FCG retainer wire, colored
purple, over the top of the selector axis pin. Don’t
push the pin all the ways through to the other side
of receiver, just far enough so it wont fall out.
|
Now
take the trip, colored purple, and slide it on to the
selector switch axis pin, colored green. Keep the trip
orientated as shown in the photos. |
|
| Click
here to go to page 5 of this tutorial |
|
